Validation queue
Accessible from the main menu under Data quality, or from a Validation card on the Dashboard, the Validation queue provides a table of validation exception data.
Queue operators and administrators use the Validation queue to review and edit validation exceptions using filters and sorting capabilities to help investigate and resolve issues.
Note: The Validation queue interface is available only to users who have Web UI 3.0 and have permissions to edit. For users without this permission, all editable values are grayed out and disabled.
By default, the table is sorted by Processed date when you first visit the Validation queue and the following filters are applied to the view:
-
Processed date = Today
-
Validation state = Fail
-
Queue state = New
-
Owner = Unassigned + current user
For more information on adjusting filters to refine your view, see Validation queue filters.
By default, the table consists of the following columns:
-
Service point ID. The unique identifier of a physical service location.
-
Meter ID. The unique identifier for a meter.
-
Processed date. The date and time of the last validation for a service point.
-
Queue state. The current state of the queue item as it moves through the validation process toward resolution. The queue states are as follows:
-
New. State assigned when a reading first enters the validation queue.
-
Pending. Indicates that changes have not been approved.
-
Failed. Indicates that the validation has failed.
-
In Progress. Indicates that changes have been made but the validation failure has not been resolved.
-
Resolved. Indicates that changes have been made and the validation failure has been resolved.
-
-
Validation state. The most recent state of a service point validation. The validation states include Error
 , Fail
  , Pass
  , Skip
  ,and Warn
  .
. -
Owner. The user that the queue item is assigned to for resolution. If unassigned, this box is blank.
Tip: To refine your view of columns within the table, use the Order columns and Show columns options in the Actions menu. To refresh the current table view to reflect the most recent data, select Refresh (![]() ) in the page header.
) in the page header.
To add columns to the table, hover over any column header, select Menu ( ), and then select Columns (
 ) . The following columns can be added to the table:
-
Notes. Any user-entered notes about the queue item.
-
Billing cycle ID. The unique identifier of a billing cycle from an external billing system.
-
Validation start date. The beginning of the validation date range.
-
Validation end date. The end of the validation date range.
-
User defined attributes (UDA). Custom attributes applicable to the service point as defined in the IEE system settings.
The table supports the following controls:
-
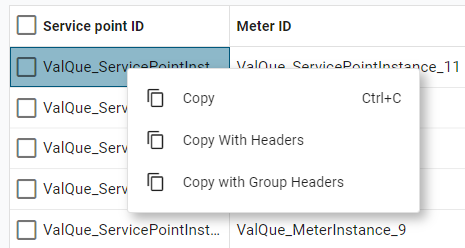
To copy data to the clipboard, select the data to be copied, right-click and select one of the following:
-
Copy
-
Copy with Headers
-
Copy with Group Headers
You can then paste the copied data to the wanted location.
Note: The copy option is available only for ID columns in the table, such as Service point ID and Meter ID.
-
-
To adjust the width of any column, drag the edges in the column header. To view any text that has been truncated due to width constraints, hover over the text to reveal a tooltip with full text.
-
To reorder the columns, drag a column header to the wanted location in the table.
-
To pin any column to the left or right side of the table, hover over the wanted column header, select Menu (
 ), and select Pin Column. Then select Pin Left or Pin Right. To clear a column pin, select No Pin.
 Tip: From the same menu, you can also reset the column width for either the current column or all columns. Select Autosize This Column or Autosize All Columns.
-
To filter by a specific value, hover over the column header, select Menu (
), select Filter ( ),
enter all or part of the value, and then press Enter. The results appear in the list. To
clear the results, clear the filter box.
),
enter all or part of the value, and then press Enter. The results appear in the list. To
clear the results, clear the filter box. -
To hide columns or to restore hidden columns, hover over any column header and select Menu (
). In the dialog that appears, select Columns () to view the column-selection tab. Clear the columns that you want to hide and select any hidden columns that you want to restore to the table. After making your selections, click anywhere outside the dialog to close it.Note: Primary columns can be reordered but not hidden.
-
To reset the columns and clear all changes to the current view, hover over any column header, select Menu (
), and select Reset Columns. -
To download the file, click Download (
 ). The file saves to your browser's configured download folder.
 -
To view more result on the same page, select Items per page dropdown menu and select a different value.
-
To view results on a different page (if applicable), select the right and left arrows at the bottom of the page.
Related topics: