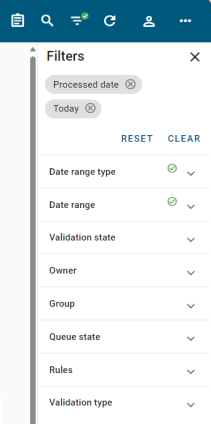
Validation queue filters
The page header on the Validation queue interface features a Filter icon. A check mark ( ) on the icon indicates that at least one filter is being applied to the current view.
![]()
When you first visit the validation queue, the default filters are applied to the view:
- Processed date = Today
- Validation state = Fail
- Owner = Unassigned + current user
- Queue state = New
To view all filters and filter options, select the Filter (![]() ) in the page header to open the Filters pane alongside the table.
) in the page header to open the Filters pane alongside the table.
Important! All currently applied filters are listed as chips at the top of the Filters pane. 
To remove any filter, select the x on its filter chip. To remove all filters, select Clear All beneath the chips.
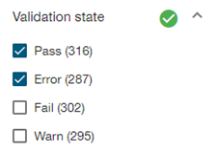
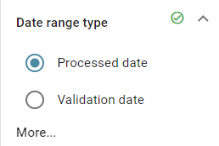
If any filter option is selected within a filter category, a check mark () in the category's panel header indicates that at least one available filter in that category is currently applied (for example, Processed date).
Note: In the Group panel, None is selected by default. Expand the panel to view the other options.
To enable a filter, select the applicable panel header to expand the panel (if it's not already open) and select your filter criteria.
Tip: Select More within a panel to open a dialog with a larger view of all filters, categories, and options. You can make changes within this dialog. Some categories include a Filter option (![]() ) to help you find an item in a long list (for example, system users within the Owner category). After making your changes, select Apply.
) to help you find an item in a long list (for example, system users within the Owner category). After making your changes, select Apply.
-
If the options include checkboxes, then one or more selections can be made, as in the Validation state panel.
-
If the options include radio buttons, then only one selection can be made, as in the Date range type panel.
-
In the Date range panel, you can select a custom date range.
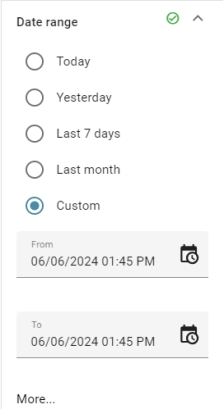
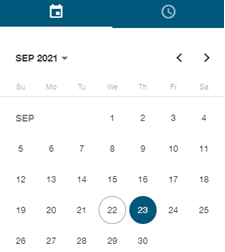
Click anywhere in the From box to open a date-picker dialog. On the Calendar tab, select a date.
On the Clock tab, select an hour, and then select a minute.
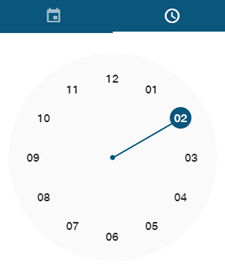
Repeat this process for the To box to select an end date and time. After you've selected the date range, the dialog disappears and your new custom date-range filter is created, as shown in a new filter chip at the top of the Filters panel.
Caution: Itron recommends using the date-range filters to return a manageable number of queue items. A filter that returns a very large number of items impacts the response time and may result in too many items for an efficient review. For example, if you specify a long date range that retrieves one million or more queue items, expect the response time to exceed ten seconds and the results table to span hundreds of pages.
-
To save the current filter values for later use, select Actions menu (
 ) in the page header and select Save view. In the dialog, assign a Name to the view and designate it as a Project view (available to you and other users) or Personal view (available only to you).
 Important! Users with the ValidationQueue permission may view and access existing project views. However, the ValidationWorkQueueAdmin permission is required to add or delete project views.
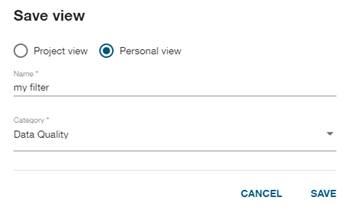
From the Category dropdown menu, select a category for the saved view (for example, Data Quality), and then select Save.
Note: The Save view function saves not only filter values but also any changes you have made to your column views via the Order columns and Show columns options in the Actions menu. For information about retrieving saved views, see View menu.
Related topics: