Reads table
On the Interactive graphing page, the Reads table displays a list of the service point channels being graphed. When you make edits to the service point channels, the number of edits appear on the card.
The card supports the following actions:
-
To maximize the card, click Show full page (
 ). This option is disabled when the card is collapsed.
 -
To return the card to the original view, click Restore card (
 ).
). -
To hide the data on the card, click Collapse (
 ).
). -
To show the data on the card, click Expand (
 ).
). -
To view more result on the same page, select the Items per page dropdown menu and select a different value.
-
To view results on a different page (if applicable), select the right and left arrows at the bottom of the page.
-
To download the data represented in the graph, see Downloading interactive graphing data.
The table supports the following actions:
-
To change the sort order, click any column header to sort by that attribute. An up arrow appears in the column header, indicating that the sort is in ascending order. No arrow indicates the default sort order. Select the column header again to switch to descending order, indicated by a down arrow.
Tip: The horizontal and vertical scroll bars appear when additional rows and columns are added to the card.
-
To adjust the width of any column, drag the edges in the column header. To view any text that has been truncated due to width constraints, hover over the text to reveal a tooltip with full text.
-
To reorder the columns, drag a column header to the preferred location in the table.
-
To pin any column to the left or right side of the table, hover over the preferred column header, select Menu (
 ), and select Pin Column. Then select Pin Left or Pin Right. To remove a column pin, select No Pin.
 Tip: From the same menu, you can also reset the column width for either the current column or all columns. Select Autosize This Column or Autosize All Columns.
-
To hide columns or to restore hidden columns, hover over any column header and select Menu (
 ).
).In the dialog that appears, select Choose Columns (
 ) to view the column-selection tab. Clear the columns that you want to hide and select any hidden columns that you want to restore to the table. Click "x" to close the dialog.
Note: Primary columns can be reordered but not hidden.
-
To reset the columns and clear all changes to the current view, hover over any column header, select Menu (
), and select Reset Columns. -
To view the reading statuses for any interval, select Info (
 ) on the same row. The Status dialog appears. Click anywhere on the page to close the dialog. When you select Edit register data in the Actions menu (
 ), the Info icon () changes to the Edit icon (
 ) for the cells that are editable.
Tip: When a cell is edited, the color of the cell changes and columns that have cells containing edits have an edit indicator (
 ) in the header.
 -
To view more result on the same page, select Items per page dropdown menu and select a different value (up to 500 items per page).
The Actions menu (![]() ) on the card provides the following options:
) on the card provides the following options:
-
Download. Allows you to download the data in the table. By default, this option is enabled when the page is in view mode, disabled when the page is in edit mode. To download the data represented in the table, see Downloading interactive graphing data.
-
Edit interval data. Allows you to edit interval read values, interval read statuses, and linked register read values. By default, this option is disabled when the page is in view mode, enabled when the page is in edit mode.
Note: When the page is edit mode, the edited legend appears on the chart and table to show the number of edited reads. You can view the changed data values on the chart for the edited channels. To switch the chart to show old and new values, click the edited legend on the chart.
You can edit the existing value of a cell by clicking on the cells. As you make edits:
-
The cell color changes to orange and the difference between the new value and old value is shown in Difference column.
-
The summary table data changes to show old and new values in the summary table.
Tip: You can update the data for the channel based on the date ranges that have been added.
When a cell value has changed, the cell color changes to orange.
-
To edit a cell that contains a numeric value, double-click in the cell to enable editing.
-
To edit a cell that contains a status, double-click in the cell or click the Edit icon (
). The Reading status dialog appears with the reading statuses listed in alphabetical order. Select the applicable reading status and click OK.Note: When you change a cell back to its original value, the cell reverts to its original color and the difference is no longer displayed in the Difference column.
-
-
Edit register data. Allows you to add new register reads, delete register reads, and edit register read values. By default, this option is enabled when the page is in view mode, disabled when the page is in edit mode. You can also edit the status of linked register channels. When selected, the Edit register reads dialog appears warning you that the linked channels may become out of sync.
Use the following procedure to edit register data for reads that are plotted in the graph:
-
Select Edit register data from the Action menu (
) in the table. A Plus icon ( ) appears next to the column name on the table.
 -
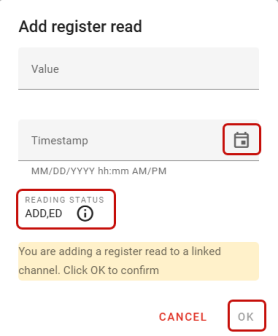
Select the Plus icon (
). The Add register read dialog appears.-
Value. Enter or copy/paste a numeric value. Only numeric values are allowed.
-
Timestamp. Select the time stamp using the date and time selector (
 ) and click Apply. You can only select dates within the dates that the Reads graph is plotted.
The Reading Status updates to reflect the changes.
-
Click OK to add the edited register read to the graph and table. The cell changes color and the status for the edited service point is updated to ADD (Added Interval (Data Correction), ED (Interval was Edited).
-
To change the status in the table, select the Edit icon (
) in the cell and select a different value from the dropdown menu. -
To delete a register read in the table, click the Trash icon (
 ) in the cell. The Delete register read dialog appears. Click OK. The cell change back to the original color, the register read no longer appears on the graph or table, and the status for the deleted service point is updated. For example, DLT (Deleted), ED (Interval was Edited).
Tip: Reading values and statuses can be copied and pasted to your preferred external location.
-
-
-
Manually estimate. Allows you to perform estimation on the selected channels. For more information on performing estimation, see Performing manual estimation.
-
Manually validate. Allows you to perform validation on the selected channels. For more information on performing validation, see Performing manual validation.
When an editing option is selected from the Actions menu (![]() ) on the card, the page switches from view mode to edit mode and the following options appear at the top of the page:
) on the card, the page switches from view mode to edit mode and the following options appear at the top of the page:
-
Reset. To delete all the changes (edits) on the page, select Reset. The Reset all changes dialog appears.
-
To reset all the changes, select Yes. Your changes are not saved on the page, the dialog closes, and the page reverts back to view mode.
-
To retain all the changes, select No. Your changes remain on the page, the dialog closes, and the page remains in edit mode.
Note: If you select Reset when there are no changes on the page, the page will revert to view mode.
-
-
Preview. Validation on each channel is initiated by the channels default validation set. By default, this option is disabled when there are no changes on the page.
-
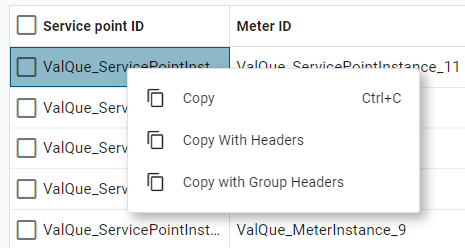
When you are previewing the changes on the page, you can copy edited data to the clipboard. Select the data to be copied, right-click, and then select one of the following:
-
Copy
-
Copy with Headers
-
Copy with Group Headers
You can then paste the copied data to the preferred location.
-
-
-
Save. To save all changes to the channel reads, select Save. The Save edited reads dialog appears. Select an edit code from the dropdown menu and click Yes. This option is disabled when there are no changes to save.
-
Use default validation. By default, this option is on. Toggle this option off to preview the validation against different validation sets that are not assigned to the service point channels.
-
Manually accept. By default, this option is off. To manually accept the failed validated reads, enable this option. This option is applicable to all the edited channels.
Related topics: