Performing a meter swap (swap with new)
Use the following procedure to swap a meter at a service point with another meter. In this case, the existing meter at the service point must be removed from that service point.

Tip: Refer to this diagram for references to Meter 1 and Meter 2 in the swap procedure.
-
From the main menu, select Configuration > Meter swap.
-
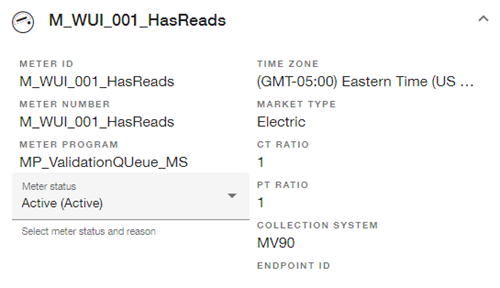
In the Swap from meter box, type or paste a valid Meter ID, and then press Enter. This is Meter 1.
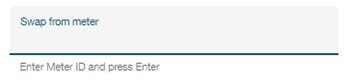
If the meter is found in the database, then the meter details appear beneath this box.
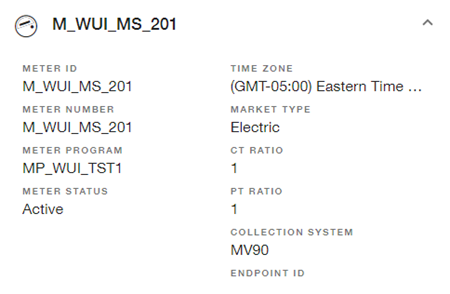
Note: Other possible fields, including Recording Device, Recorder Program, CT Ratio, PT Ratio, Pressure Compensation Factor, are dynamic and depend on the measured Commodity for the meter.
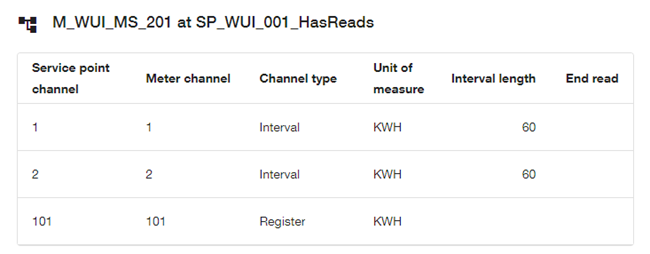
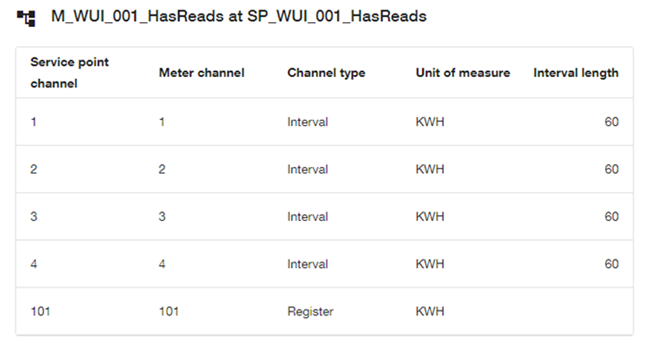
The Swap from meter column includes a Service point card with details about the service point currently associated with this meter.

The Channels table provides meter channel, unit-of-measure (UOM), interval-length, and end-read details for this service point. Scroll down to view all rows.
-
In the Swap to meter box, type or paste a valid Meter ID, and then press Enter. This is Meter 2, which is already be connected to a service point.
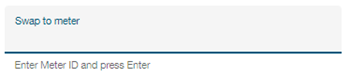
If the meter is found in the database, then the Meter details card appears beneath this box.
-
From the Meter status dropdown, select Active (Active) so that the new meter (Meter 2) has a status of Active after the swap.
-
Expand the Service point card. This represents the swap parameters for the target service point.
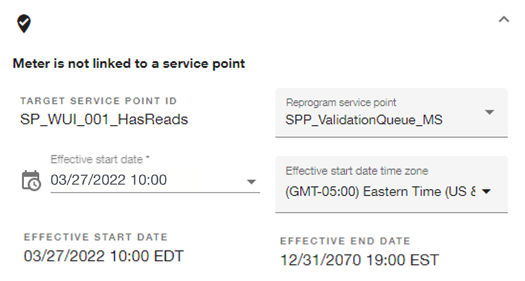
By default, the current service point program is selected. If needed, you can select another compatible service point program from the Reprogram service point dropdown menu.
-
Select a start date and time for the new meter (Meter 2):
-
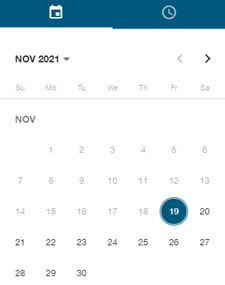
Click anywhere in the Effective start date box to open a date-picker dialog.
Important! The effective start date/time for the new meter (Meter 2) must be after the Link Start Date of Meter 1 and before the Link End Date of Meter 1. Selections beyond this range are not supported.
On the Calendar tab, select a date. By default, the current date is selected.
-
On the Clock tab, select an hour, and then select a minute.
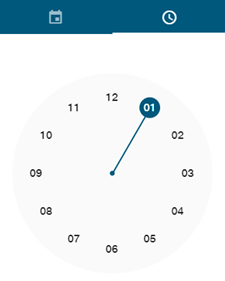
Note: Above the Clock tab, you can select AM or PM to change the selection if needed.
After you've selected the start date and time, the dialog disappears, and your selection appears in the Effective start date box of the Service point card. The Effective start date property reflects the selected effective start date in the selected time zone converted to the browser's time zone.
To edit your selection, repeat these steps.
Tip: Make sure that the preselected Effective start date time zone is correct for the target service point. If it is not correct, select the correct time zone from the dropdown menu.
-
-
On the Service point card, the old meter's program-based configuration (PBC) is selected for the new meter. If needed, select another PBC from the Reprogram service point dropdown menu.
-
On the Service point card, select a Time zone for the new meter from the dropdown menu.
-
Review the Channels table for the new meter (Meter 2).
-
Click Continue to proceed to the Review data step.
Note: If the service point has existing reads, then a message appears (for example: "(To meter) Meter M_WUI_MSK_301 will be moved to service point (target service point id) SP_WUI_MSK_305 from (effective start date) 01/01/2022 12:40 IST. Service point ServicePointA has existing data from 08/15/2020 00:00 EST"). If the service point has existing reads and the interval length differs, then another message appears (for example: "(To meter) Meter M_WUI_MSK_301 will be moved to service point (target service point id) SP_WUI_MSK_305 from (effective start date) 01/01/2022 12:40 IST. Service point ServicePointA has existing data from 08/15/2020 00:00 EST. The interval length has changed. Existing data will be removed").
-
(This step is applicable only if existing reads span beyond the effective start date; otherwise, skip to the next step.) From the Action on interval data dropdown menu, select an option for existing data at this service point: Keep the data or Remove the data. If you select Remove the data, then the Delete options dialog appears. Select Permanently delete or Marked as deleted.
Important! If the interval length has changed, then the Keep the data option is not available. In this case, Remove the data is selected by default, and then you can select either Permanently delete or Marked as deleted. If the interval length has not changed, then Keep the data is selected by default. In this case, the Remove the data option is not available.
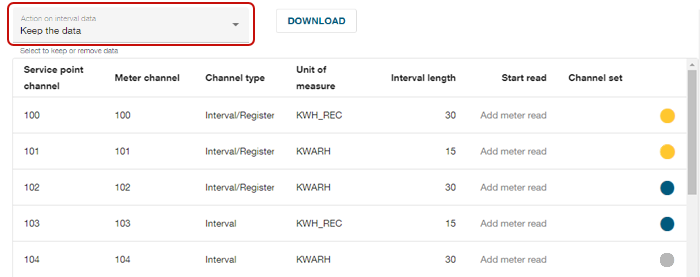
Note: If the CT/PT ratio has changed, then the following warning message appears: "The CT/PT ratio has changed. This may impact existing data." If there are any existing register reads, then the following warning message appears: "Existing register data is removed."
The color-coded icons in the last column indicate the status of existing reads for each channel:
- Yellow: Estimated reads only
- Blue: Combination of actual, edited, and estimated reads
- Gray: No reads
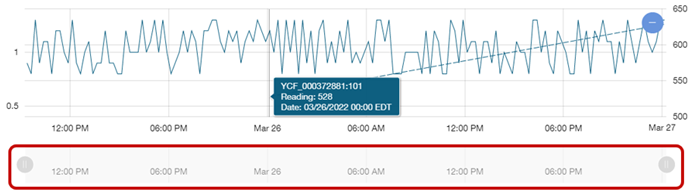
Click a yellow or blue icon to access a usage graph for the represented channel. Use the slider below the graph to zoom in or out on specific periods of time.
-
Review the information in the table showing the new configuration details for the service point. If you need to make changes, click Back to return to the Select meters step.
Tip: Click Download to save the existing read data for all channels. The file is saved in Common Reading File (CRF) format. CRF is an XML file format developed by Itron to enable software applications with different native file formats to exchange meter route and energy use data.
-
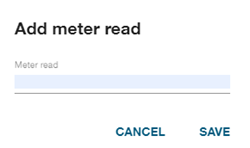
(Optional) If needed, you can enter starting reads for each of the registers to be active in the new meter. In the Start read column, click Add meter read for the wanted channel. In the dialog that appears, enter a value (consistent with the channel's unit of measure) in the Meter read box, and then click Save. Repeat this process for any other channels.
-
To save the configuration, click Save. A confirmation dialog appears. Click Save to confirm the swap.
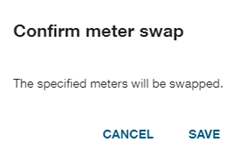
Note: If there are no existing reads, the confirmation message states only that the specified meters are going to be swapped. If you opted to remove existing data, the confirmation states, "The specified meters are going to be swapped and existing interval and register data are going to be removed." If you opted to keep existing data, the confirmation states, "The specified meters are going to be swapped, existing interval data is going to be retained, and existing register data are going to be removed."
If the meter swap fails, the confirmation dialog indicates the selected meters, the service point, and the reason for the error. Click the Copy icon (
 ) to save the error information to your clipboard. You can then paste this text into a document or email message for further investigation.
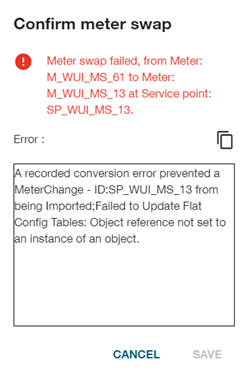
-
Click Cancel to close the dialog.
Related topics: