Filter Editor
The Filter Editor Command constructs and applies a filter to a list of items. The Filter Editor applies to the List Tabs and Dynamic Search Folders (Folder Properties). The Filter Editor dialog uses a filtering language that supports construction of both simple and complex filtering rules. In most cases, the Filter Editor is activated through the View menu or through the corresponding Toolbar button showing a funnel with a green plus sign.
The following image isolates the Filter Editor and shows the filter elements.
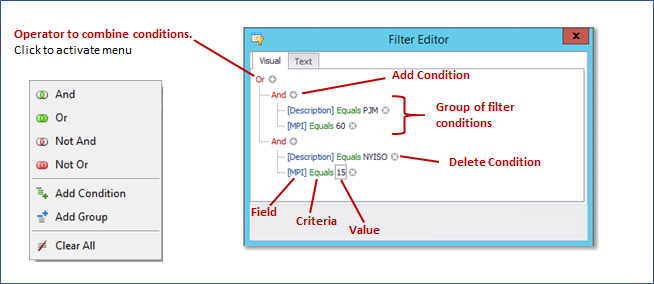
Operators (And, Or, Not And, Not Or) are used to combine conditions. Clicking on an operator at any level opens the Menu, shown on the left. Use the menu to change the operator to add a condition, to add a group of conditions, to clear the filter from the top operator, or to Remove a Group from indented operators.
There are two ways to add a condition to an operator. The first way is to click on the operator and select Add Condition from the menu. The second is to click on the gray plus sign to the right of the operator. In either case a condition line is inserted. Each condition line contains the following elements, Field, Criteria, Value.
- Click on the Field to select the database field to be used in the condition.
- Click on the Criteria to select from a list of criteria (e.g., equals, starts with, contains).
- Click on the Value to enter a number or text string depending on the type of criteria.
Edit the condition elements for each line item and press OK when the filter criteria is completed. This action dismisses the filter dialog. Check the List Tab in the workspace to view the applied filter settings. Return to the Filter Properties dialog if further edits are needed.