Editing Licenses
After selecting Licenses at the top of the edit tenant dialog, all licenses and their active periods are listed under Added licenses.
Note: Any license that has the Perpetual checkbox selected does not have an active period displayed.
Use the following procedure to add a license to the tenant:
-
Select the checkbox next to any license that you want to add to the tenant from the License dropdown menu. To filter the options that appear in the License dropdown menu, enter a value in the Search box.
-
Click the Add button.
The licenses that were selected are added to the Added licenses section.
-
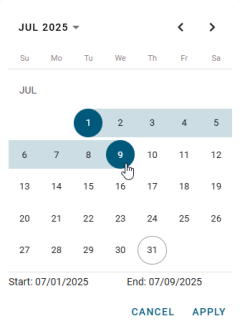
For each license, either select the Perpetual checkbox or set the license's active period using the Expiration date box. To set the license's active period, open a date-picker dialog by clicking the Calendar icon (
 ). On the calendar, select a beginning date and an end date. The first date chosen is used as the beginning date, and the second date chosen is used as the end date. Select Apply when the beginning date and end date have both been chosen. Licenses that were already assigned to the tenant can have their active periods edited in the same way as the licenses that were just added to the tenant.
Note: By default, licenses are set as Perpetual with the active period starting dates of the current day at 12:00 AM.
Note: You can manually type the beginning date and end date instead of using the calendar.
To remove any licenses from the tenant, click the Remove icon ( ) next to the license that you want to remove. After clicking the Remove icon, the license is removed from the Added licenses list.
When you are done editing the tenant's authorization, either select another section from the top of the Edit tenant dialog or select the Review section and continue from Step 4 on Editing tenants.
