Investigation actions
Investigation actions can be initiated from the selected table on the Event Investigation page.
Note: For information about selecting an analytics table, refer to View menu.
In the table, you must select one or more checkboxes for every entity to perform an action on. After making your selections, click the Actions menu icon (![]() ) to open the menu.
) to open the menu.
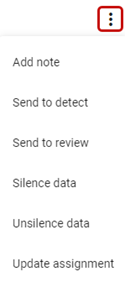
The following actions are supported (menu options may vary by analytics type):
-
Add note. Adds a new note to a single item or many items.
-
In the Note Text field, type your note.
-
(Optional) Click in the Attach File field to open the file explorer. Select the file to attach and click Open.
Note: By default, the file explorer filters for CSV files. To select another file type, select All Files from the dropdown.
-
From the Entity dropdown, select the entity (such as Service Point).
-
Click Add and then click Close.
-
-
Send to detect. Moves selected items to the Detect state. Any open fieldwork must be completed before an item can be moved back to Detect.
-
In the Note field, type the reason for moving the data to detect.
-
Click Send and then click Close.
Tip: Moving items from Silence Data or Unsilence Data does not undo the silencing or unsilencing of the data. To undo silencing data, use the Unsilence data action. To re-silence data, use the Silence data action.
-
-
Send to review. Moves the selected service points into the Review state.
-
Using the dropdown menus, complete the following fields: Review Type, Issue, Assign to (optional), and Priority (optional).
-
(Optional) Type a note in the Note field.
-
Click Send and then click Close.
-
-
Silence data. Moves selected items to the Silence Data state where they will be re-scored. Readings and other data prior to today's date will be ignored in calculating scores for those Service Points.
-
From the Issue dropdown, select the error.
Note: Select the issue that was detected for reporting purposes.
-
(Optional) Type a note in the Note field.
-
In the Silence Expiration Date field, select a future date to extend the time the service point remains in the Silence state before returning to Detect.
-
Click Silence and then click Close.
-
-
Unsilence data. Moves selected items to the Unsilence Data state to be re-scored. Any previous actions to silence data for these items will be ignored during future scoring (all data will be considered for scoring).
- (Optional) Type a note in the Note field.
-
Click Unsilence and then click Close.
-
Update assignment. Updates the issue, assigned user, and priority for service points in the Review state.
-
Using the dropdown menus, update any of the following fields as needed: Issue, Assign to, and Priority.
-
(Optional) Type a note in the Note field.
-
Click Update and then click Close.
-