Permissions
Important! The tenant permissions interface is available only to Tenant Admins, Tenant Readers, and personas with specific access grants.
Accessible from the Administration menu under Tenant > Permissions, the Tenant Permissions page contains configuration cards for viewing and assigning roles and permissions to users and groups. The Permissions page contains the following interactive cards: Users, Roles, and Groups. The link icon at the top of each card indicates its status:
-
Primary card:

-
Linked card:

By default, the Users card is set as the primary card, as indicated by the blue link icon. To change your primary card, click the link icon on any card.
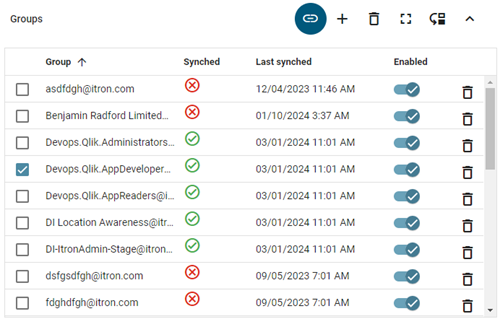
Tip: To expand any card for easier viewing, click the expand icon ( ). To restore the original view, click the collapse icon (
![]() ). To locate an existing item in a table, click any column header to sort by that column. An up arrow appears in the column header, indicating that the sort is in ascending order. Click the column header again to switch to descending order, indicated by a down arrow.
). To locate an existing item in a table, click any column header to sort by that column. An up arrow appears in the column header, indicating that the sort is in ascending order. Click the column header again to switch to descending order, indicated by a down arrow.
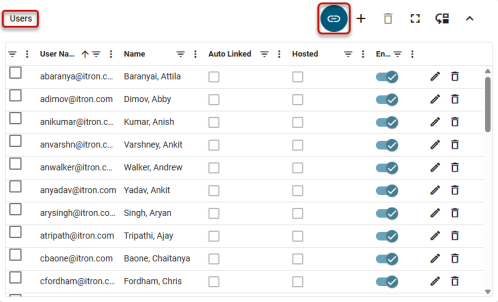
Users card
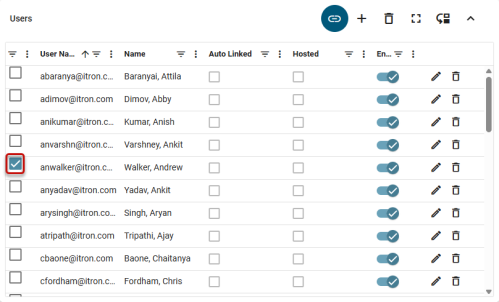
When the Users card is primary, you can manage the users listed on the card. Select one or more users to view their associated roles and groups, indicated in the checkbox columns on the other cards.
Note: If multiple users are selected, some checkboxes on the other cards may display a line ( ) instead of a check. This means that the indicated roles or groups apply to at least one of the selected users, but not all of them.
The columns present on the Users card are explained in the following list:
-
User Name. The username of the user.
-
Name. The first name and last name of the user.
-
Auto Linked. Indicates that the user was created through the user group synchronization.
-
Hosted. Indicates that the user is hosted in an Itron-hosted domain. This user can only be in one tenant, and the password for this user is provided by Itron.
-
Enabled. Indicates whether or not the user is enabled in the tenant.
The Users card supports the following actions:
-
To view properties for any user, click on a name in the User Name column to open the User properties panel.
-
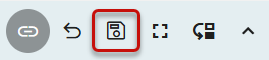
To enable roles for one or more users, make sure that the Users card is set as primary. Select users on the Users card and then make your role selections on the Roles card. Click the Save icon on the Roles card to complete the new role assignments.
Note: To cancel role changes without saving them, click the Refresh icon (
 ) on the Roles card.
 -
To add a user to the tenant, make sure that the Users card is set as primary and click the plus icon (
 ). In the dialog that appears, select a Domain from the dropdown. Depending on what type of domain that is selected, different sets of options appear.
If an Itron-hosted domain is selected, there are three options that appear: New User, Upload users, and Existing users. Use the information in the following list to properly add users depending on what option you select:
-
New User. To manually add a new user to the tenant, select New User. Fill out the Username, First name, Last name, Email address, and Mobile Phone number boxes that appear. Only boxes with an asterisk are required, but Itron recommends filling out as much information as possible. After filling out all required information, click Create. The new user appears on the Users card.
-
Upload users. Click the Browse button to open the file explorer. Select a .csv file that contains the users to be added to the tenant. The users that will be added appear in the list below the Browse button. After selecting the proper file, click Create. The new users appear on the Users card.
-
Existing user. Select the checkbox next to the existing user or users to be added to the tenant. After the selections have been made, click the Link button. The new users appear on the Users card.
If a federated domain is selected, there are two options that appear: Link User and Existing user.
-
Link User. Enter the username of the user that you want to add to the tenant. If necessary, you can enter more usernames to add multiple users to the tenant at the same time. After entering all of the desired usernames, select Link. The new users appear on the Users card.
-
Existing user. Select the checkbox next to the existing user or users to be added to the tenant. After the selections have been made, click the Link button. The new users appear on the Users card.
-
-
To disable a user account without deleting it, click the enabled slider icon (
 ) in the Enabled column and then click Save in the confirmation dialog.
 -
To enable a user that is currently disabled, click the disabled slider icon (
 ) in the Enabled column and then click Save in the confirmation dialog.
 -
To edit a user, select the Edit icon (
 ) on the same row. On the Edit user name dialog that appears, update the information as needed and click Save. Click Cancel to close the dialog without saving any changes.
 -
To delete a user, click the Remove icon (
 ) on the same row followed by Remove in the confirmation dialog.
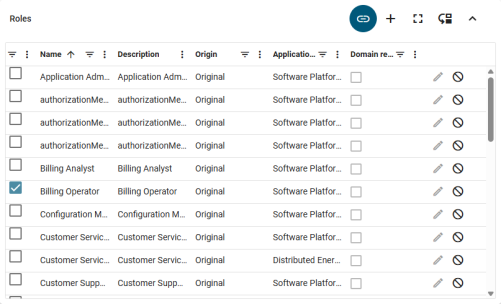
Roles card
When the Roles card is primary, you can identify which users have a given role (such as Billing Operator). You can also assign roles to users and groups. Select one or more roles to automatically indicate the corresponding users and groups on the other cards.
Note: If multiple roles are selected, some checkboxes on the other cards may display a line () instead of a check. This means that the indicated users or groups apply to at least one of the selected roles, but not all of them.
The columns present on the Roles card are explained in the following list:
-
Name. The name of the role.
-
Description. The description of the role.
-
Origin. Indicates the origin or status of the role. Possible values are:
-
Original. The role has its original, tenant-independent default settings.
-
Customized. The role has been modified from its default settings in the current tenant.
-
Suppressed. The role has been disabled in the current tenant.
-
NewCustom. The role has been created from scratch in the current tenant. NewCustom roles do not have any tenant-independent default settings.
-
-
Application name. The name of the application that the role is for.
-
Domain restrictions. Indicates if domain restrictions are enabled on the role. Enabled domain restrictions means that during access token issuance, the claim is only included if the authenticated user's domain matches one of the allowed domains.
The Roles card supports the following actions:
-
To view properties for any role, click on a role name in the Name column to open the Role details panel. On the Role details panel, click the Properties tab at the top of the panel. Click the Claims tab at the top of the panel to view the claims that the selected role has.
-
To enable users with one or more roles, make sure that the Roles card is set as primary. Make your role selections on the Roles card and then select users on the Users card. Click the Save icon on the Users card to complete the new assignments.
Note: To cancel changes without saving them, click the Refresh icon (
) on the Users card. -
To enable groups with one or more roles, make sure that the Roles card is set as primary. Make your role selections on the Roles card and then select groups on the Groups card. Click the Save icon on the Groups card to complete the new assignments.
Roles cannot be assigned to users and groups at the same time. These actions must be performed separately.
Note: To cancel changes without saving them, click the Refresh icon (
) on the Groups card. -
To add a role to the tenant, make sure that the Roles card is set as primary and click the plus icon (
). In the dialog that appears, select an application from the dropdown and type a unique role name in the Name field. Enter a Description of the role (optional). You can also select one or more existing roles from the list, if available. Click Add. The new role appears on the Roles card. -
To disable a role without deleting it, click the Disable icon (
 ) on the same row followed by Save in the confirmation dialog.
 -
To edit a role, click the Edit icon (
) on the same row. On the Edit role dialog that appears, you can make changes to the Name and Description fields, or you can select one or more existing roles from the list (if any are available). When you are finished editing, click Save. Click Cancel to close the dialog without saving any changes.Tip: When editing a role, the value in the Origin column changes from Original to Customized. A value of Customized indicates that the role has been modified from its default settings, while a value of Original indicates that the role has its default settings. Other values that can appear in the Origin column are Suppressed (when a role is disabled) and NewCustom (for a new custom role that was added).
-
To revert an edited role back to its default settings, click the Edit icon (
) on the same row followed by Reset. -
To enable a role that is currently disabled, click the Enable icon (
 ) on the same row followed by Save in the confirmation dialog.
 -
To delete a role, click the Remove icon (
) on the same row followed by Remove in the confirmation dialog. Note that baseline roles that are system standards cannot be deleted.
Note: For more information about roles, see Personas and roles.
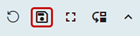
Groups card
When the Groups card is primary, you can manage groups and add roles to groups. Select one or more groups to automatically indicate the corresponding users and roles on the other cards.
Note: If multiple groups are selected, some checkboxes on the other cards may display a line () instead of a check. This means that the indicated users or roles apply to at least one of the selected groups, but not all of them.
The columns present on the Groups card are explained in the following list:
-
Group. The name of the group.
-
Synched. Indicates whether or not the sync job was successful or not.
Note: Sync job is a scheduled job which runs every 15 minutes. It reads the members of all Microsoft Entra ID groups that are registered and visible on the Groups card. All members found in the groups are automatically added to the tenant (marked as Auto Linked users on the Users card). Roles that are assigned to the groups are automatically assigned to these users. Users who are manually added to the tenant will be skipped by the job, and manual user and role assignments will be preserved. A sync failure usually indicates a technical issue, such as not having permissions to read the customer's Entra ID. A sync failure can also happen if the registered group is not found in Microsoft Entra ID.
-
Last synched. The date and time of the last successful synchronization of the group. In case of a failure, it indicates the date and time of the failure. If the failure persists along subsequent sync job runnings, the date and time reflects the first occurrence of the failure.
-
Enabled. Indicates whether or not the group is enrolled in the tenant.
|
Note: The Synched column indicates each group's current status within the selected domain:
|


 Hover over the icon to view a status tooltip.
The Groups card supports the following actions:
-
To view properties for any group, click on a group name in the Group column to open the Group properties panel.
-
To enable roles for one or more groups, make sure that the Groups card is set as primary. Select groups on the Groups card and then make your role selections on the Roles card. Click the Save icon on the Roles card to complete the new role assignments.
Note: To cancel role changes without saving them, click the Refresh icon (
) on the Roles card. -
To add a group to the tenant, make sure that the Groups card is set as primary and click the plus icon (
). In the dialog that appears, select a Domain from the dropdown and enter a Group name. Click Save. The new group appears on the Groups card. -
To disable a group without deleting it, click the enabled slider icon (
) in the Enabled column and then click Save in the confirmation dialog. -
To enable a group that is currently disabled, click the disabled slider icon (
) in the Enabled column and then click Save in the confirmation dialog. -
To delete a group, click the Remove icon (
) on the same row followed by Remove in the confirmation dialog.
Card order
To adjust the page layout, click the reorder icon ( ) on any card to open the Card order dialog. The cards listed under Leading column appear on the left side of the page, and the cards under Trailing column appear on the right side of the page.
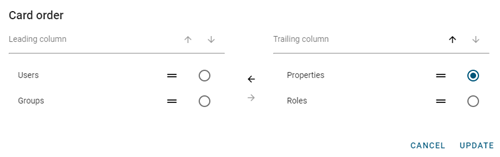
To move a card from one column to the other, or to change the order within a column, simply drag an item to the desired location, or select an item and then move it by clicking the arrows in any available direction. Click Update to save your changes.
Note: The Properties panel appears only when you select a user, role, or group to view its properties. You can configure its desired location on the page in relation to the Users, Roles, and Groups cards.
Column options
Each table on the Permissions page supports the following column options:
-
To reorder the columns, drag a column header to the desired location in the table.
-
Click any column header to sort by that attribute . An up arrow appears by the column header, indicating that the sort is in ascending order. Click the column header again to switch to descending order, indicated by a down arrow. To clear an ascending or descending sort from a column, select horizontal Actions menu icon (
 ) followed by Clear Sort.
Note: Columns can also be sorted in ascending or descending order by selecting the horizontal Actions menu icon (
) followed by either Sort Ascending or Sort Descending. -
To pin any column to the left or right side of the table, hover over the desired column header, click the horizontal Actions menu icon (
), and select Pin Column. Then select Pin Left or Pin Right. To clear a column pin, select No Pin.
Tip: From the same menu, you can also reset the column width for either the current column or all columns. Select Autosize This Column or Autosize All Columns.
-
To hide columns or to restore hidden columns, hover over any column header and click the horizontal Actions menu icon (
). In the dialog that appears, click Choose Columns to view the column-selection tab.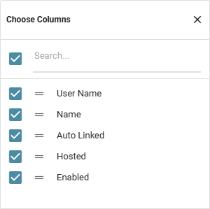
Deselect the columns that you want to hide, and select any hidden columns that you want to restore to the table.
Note: The first and last columns (selection column and actions column) cannot be hidden.
After making your selections, click the Close icon in the top-right corner of the dialog (
 ) to close it.
Tip: To locate a column name in a long list of columns, type all or part of a column name in the Search box. Only matching results appear in the list. To restore the full list, clear the Search box.
-
To filter by items in a column, click the Filter icon (
 ) in the column you want to filter (not available for all columns). Depending on column type, the following filter options are available:
-
For columns that contain names, the Contains operator is selected by default. If needed, select another operator from the dropdown. Type all or part of a value in the Filter field.
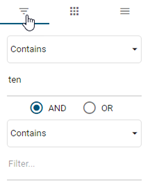
The column displays only matching results.
Note: You can include additional search criteria in your filter. When you enter text in the Filter field, a Boolean operator selection appears with the And (default selection) and Or options, as well as an additional Filter field. Type all or part of a value in each additional Filter field.
-
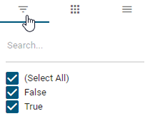
For columns that contain predefined selections only, select or deselect any of the available options, or type all or part of a value in the Search field. Click anywhere outside of the dialog to close it. The column displays only matching results.
-
-
To reset the columns and clear all changes to the current table view, click the horizontal Actions menu icon (
) followed by Reset columns.
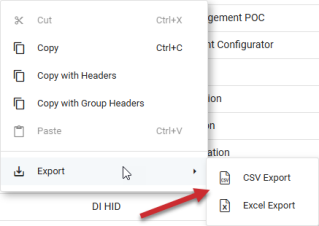
Any of the cards on the Tenant Permissions page can have their data exported as a CSV file or an Excel file. To do so, right-click inside the table, hover the cursor over Export, and click either CSV Export or Excel Export.