Editing a tenant
-
Navigate to Administration > Environment > Tenants.
-
Locate the row with the name of the tenant you wish to edit.
Tip: To locate a tenant in the list, click the Search box and enter all or part of a tenant name. The list automatically updates with your search results as you enter the search term.
-
Click the Edit icon (
 ) on the same row. Alternatively, click the tenant Name to navigate to the tenant Properties tab, and then click the Edit icon ().
Note: When editing an on-premises tenant, Authorization and Configuration do not appear.
-
In the Customer information dialog, update the following fields as needed:
-
Tenant type. From the dropdown menu, select the tenant type. This action triggers a validation to determine whether the selected tenant type matches the existing database record.
The available tenant types support the following customer number formats.
None
Salesforce ID
Oracle Number
Description
Sandbox, Sanity Test, Stage, Test
✓
Available for customer testing and validation before moving to production. Requires a valid Oracle Number (format: NNNNNN).
Pilot
✓
✓
Used for a limited period of time for users to become familiar with the system.
Production
✓
Used for a production environment. Requires a valid Oracle Number.
Itron Internal
✓
Used for demonstration purposes only (if available).
Important! If you select a Tenant type that differs from the tenant type in the database record for this customer, the upcoming steps in the tenant wizard will synchronize data for this tenant, and the system will import all Outcomes, Licenses, and Applications associated with the Customer number. However, if you select the Tenant type that matches the current database record, the wizard provides a link to this tenant's existing properties, where you can modify the properties directly. See also Editing a tenant.
-
Customer ID type. From the dropdown menu, select Oracle Number or Salesforce Opportunity Number.
-
Customer number. Type the tenant's Oracle Number or Salesforce Opportunity Number. For Test and Production tenant types, a valid Oracle Number is required (format: NNNNNN) and is validated against the Oracle database. For Pilot tenant types, a Salesforce Opportunity Number is allowed (format: NN / NNNNN) and is validated by format only. Unvalidated values are rejected.
Note: For pilot tenant types, the Customer number can be changed from a Salesforce Opportunity Number to an Oracle Number when it becomes available.
-
Customer name. This field automatically populates if the Customer number is validated.
Important! If the entered Customer number is not validated, you can manually enter the Customer name. In this case, the customer is considered a new tenant, and a Tenant type of Itron Internal is automatically selected. Upon completion of the tenant wizard, the customer information is added to the database. Changes to the tenant properties can be made later.
-
-
Click Next. Check the following Properties fields:
-
Short name. A unique identifier of up to 15 characters. This value is automatically derived from the Customer number and selected Tenant type and cannot be edited after the tenant has been created.
-
Name. The name of the tenant. This value is automatically populated based on the Customer name and selected Tenant type.
-
Description. (Optional) A short description (may include an identification number).
Click Next.
-
-
Enter the following Authorization information:
-
Hosting domain. From the dropdown menu, select an Itron-hosted domain or select None to federate an internal domain for this tenant.
-
Domains. Federated domain(s) intended to be used by the customer.
-
Peer domains. First- or third-party domains that do not belong to the customer (for example, itron.com).
Click Next.
-
-
Under Licenses, select and configure outcome licenses:
-
Select the checkbox next to any license that you want to add to the tenant from the License dropdown menu. To filter the options that appear in the License dropdown menu, enter a value in the Search box.

-
Click Add. The licenses that were selected are added to the Added licenses section.
Tip: Make a note of the license item number (for example, 3000-00184). If needed, you can quickly access this selection again by entering all or part of the item number in the Item # filter field to narrow the dropdown selections accordingly.
-
For each license, either select the Perpetual checkbox or set the license's active period using the Expiration date box. To set the license's active period, open a date-picker dialog by clicking the Calendar icon (
 ). On the calendar, select a beginning date and an end date. The first date chosen is used as the beginning date, and the second date chosen is used as the end date. Select Apply when the beginning date and end date have both been chosen. Licenses that were already assigned to the tenant can have their active periods edited in the same way as the licenses that were just added to the tenant.
Note: By default, licenses are set as Perpetual with the active period starting dates of the current day at 12:00 AM.
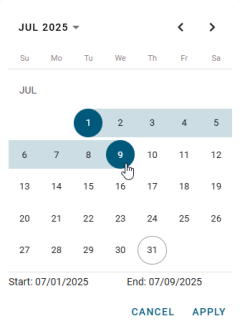
Note: You can manually type the beginning date and end date instead of using the calendar.
To remove any licenses from the tenant, click the Remove icon (
 ) next to the license that you want to remove. After clicking the Remove icon, the license is removed from the Added licenses list.
 -
Click Next.
-
-
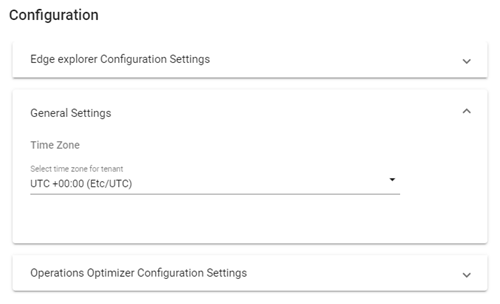
On the Configuration step, expand the panels to view the settings for each selected outcome and to select additional configuration settings if needed. Under General Settings, you can change the Time Zone (UTC format) from the dropdown.
Click Next.
-
On the Review step, check the tenant information and all of your changes. New values appear in green text. Edited and removed values appear in red text with strike-through lines. To make changes, click Back to navigate to previous steps.
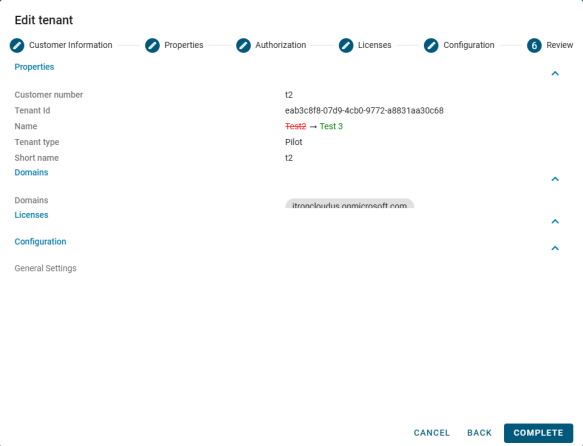
Tip: You can collapse any section by clicking its collapse icon (
 ). Click the expand icon (
 ) to restore a collapsed section.
When ready to proceed, click Complete.
-
After clicking Complete, the Tenant update summary appears. If your update completed but contains warnings, a yellow warning message appears at the top of the dialog. Click the Copy icon (
 ). The tenant's ID, name, short name, description, type, and customer information are copied to your clipboard. Paste this information immediately to a text file and save it in a secure location. Alternatively, click the adjacent Download icon (
 ) to retrieve and save this information as a .csv file (saved to your browser's default download folder). For an on-premises tenant, you can click the Licenses download icon (
 ) to retrieve the license file or files (.lic format). These files will download to your browser's default download location. The Licenses download icon does not appear for cloud tenants.
Important! These credentials are essential for the administrator and will not be provided again. Be sure to copy this summary immediately and save it.

-
Click Close to exit the tenant creation wizard and continue managing or creating tenants.