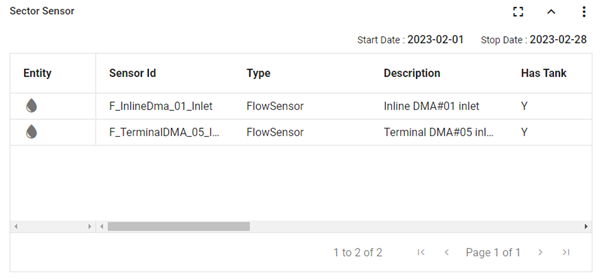
Sector sensor
The Sector Sensor table provides a summary of all active sensors associated with the entity selected from the Sectors table during the selected date range.
To expand the panel for a larger display, click the maximize icon (![]() ). To restore the panel to its original size, click the minimize icon (
). To restore the panel to its original size, click the minimize icon (![]() ).
).
|
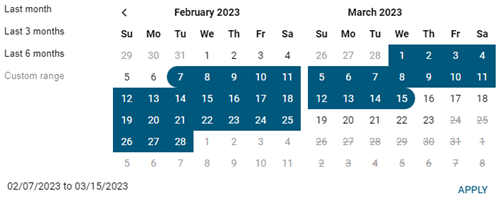
Tip: By default, Last month is selected. To change the date range, click the calendar icon ( For the Custom range option, select a date range from the calendar.
|
The table supports the following controls:
-
Hover over any cell to reveal a tooltip with the complete text if the field is truncated due to width constraints.
-
To reorder the columns, drag a column header to the desired location in the table. The Entity and Sensor ID columns cannot be reordered.
-
To change the sort order, click any column header to sort by that attribute. An up arrow appears in the column header, indicating that the sort is in ascending order. Click the column header again to switch to descending order, indicated by a down arrow.
-
To pin any column to the left or right side of the table, hover over the desired column header, click the horizontal menu icon (
 ), and select Pin Column. Then select Pin Left or Pin Right. To clear a column pin, select No Pin.
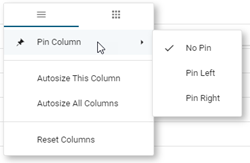
Tip: From the same menu, you can also reset the column width for either the current column or all columns. Select Autosize This Column or Autosize All Columns.
-
To hide columns or to restore hidden columns, hover over any column header and click the horizontal menu icon (
). In the dialog that appears, click the grid icon to view the column-selection tab.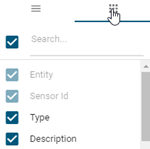
Deselect the columns that you want to hide, and select any hidden columns that you want to restore to the table. After making your selections, click anywhere outside the dialog to close it.
Tip: To locate a column name in a long list of columns, type all or part of a column name in the Search box and press Enter. Only matching results appear in the list. To restore the full list, clear the Search box.
-
To reset the columns and clear all changes to the current view, hover over any column header, click the horizontal menu icon (
), and select Reset columns. -
To export the data represented in the table, click the Actions menu icon (
 ) and select Export to CSV or Export to Excel. A .csv or .xlxs file is saved to your browser's configured download location.
Note: The export file includes all available rows and columns, regardless of column visibility options.