Running task types
Use the following procedure to create and run a task template with task-specific parameters:
-
Select the row's Actions menu (
 ) and then select Run. The Task details dialog appears.
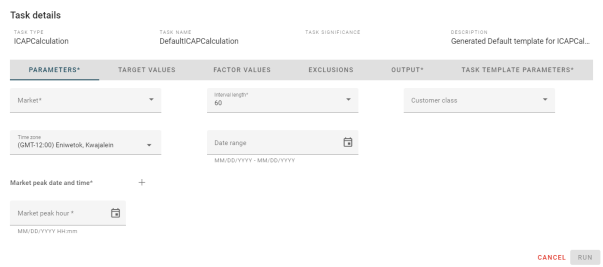
-
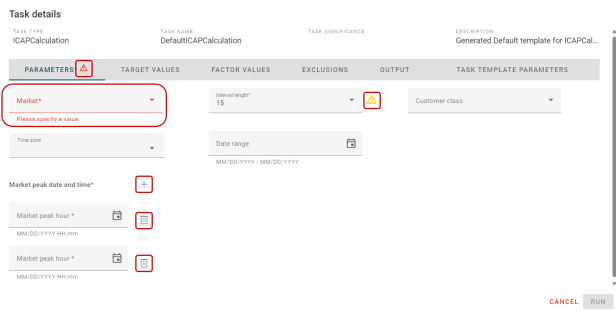
Some of the tabs in the dialog allow you to add a row by clicking
 . To delete a row, click Trash (
 ).
).
-
An asterisk (*) indicates a required field. You must completed all required fields to navigate through the dialog.
-
The Warning indicator (
 ) appears next to the tab header to indicate a required field is blank or invalid.
 -
The Change indicator (
 ) appears to indicate changes have been made.
-
Complete the following tabs:
-
Parameters. Allows you to set the parameters for the task template.
-
From the Market dropdown menu, select a market.
-
From the Time zone dropdown menu, select a time zone. By default, the time zone updates based on the market selected.
-
In the Market peak date and time box, select Calendar (
 ) , select a date and time, and then click Apply.
 -
From the Interval length dropdown menu, select a value. By default, the value is set to 60.
-
(Optional) In the Date range box, select Calendar (
), select a date range, and then click Apply. -
(Optional) From the Customer class dropdown menu, select a customer class.
-
Select the Target Values tab to continue.
-
-
Target Values. Allows you to add target values by None, Market, or Zone. By default, None is selected. If none applies, select the Factor Values tab to continue.
-
Select Market or Zone.
-
From the Market target entity dropdown menu, select a market (if applicable).
-
From the Zone target entity dropdown menu, select a zone (if applicable).
-
(Optional) Enter a numeric value for Target value.
-
From the UOM dropdown menu, select KWH or MWH.
-
Select the Factor Values tab to continue.
-
-
Factor Values. Allows you to add factor values by Market, Zone, and Customer class. By default, none of the options are selected. If you do not want to add factor values, select the Exclusions tab to continue.
Tip: You can select multiple factor value entities for each factor value by clicking
 . The vertical scroll bar appears when additional rows are added to the tab.
-
From the Market factors entity dropdown menu, select a market (if applicable). The Factor type and Factor value boxes appear.
-
Enter a value for Factor type.
-
Enter a numeric value for Factor value.
-
-
From the Zone factors entity dropdown menu, select a zone (if applicable). The Factor type and Factor value boxes appear. The Application and Reference factor boxes appear only when Market is selected (step 1).
-
Enter a value for Factor type.
-
Enter a numeric value for Factor value.
-
From the Application dropdown menu, select an application. By default, In addition is selected.
-
From the Reference factor dropdown menu, select a reference factor. This option is disabled (grayed-out) when In addition is selected in the previous step.
-
-
From the Customer class factors entity dropdown menu, select a customer class (if applicable). The Factor type and Factor value boxes appear. The Application and Reference factor boxes appear only when Market is selected (step 1).
-
Enter a value for Factor type.
-
Enter a numeric value for Factor value.
-
From the Application dropdown menu, select an application. By default, In addition is selected.
-
From the Reference factor dropdown menu, select a reference factor. This option is disabled (grayed-out) when In addition is selected in the previous step.
-
-
Select the Exclusions tab to continue.
-
-
Exclusions. Allows you to enter exclusions by None, Group, or Text. By default, None is selected. If none applies, select the Output tab to continue.
-
From the Group types dropdown menu, select a group (if applicable). By default, the Group names dropdown menu populates with the first group name in the list. Use the dropdown menu to select a different group name.
-
Text. Enter one or more service points separated by a comma in the text box (if applicable).
-
Select the Output tab to continue.
-
-
Output. Allow you to export the data in the dialog.
-
From the Export file type dropdown menu, select CSV or Excel.
-
In the Export file name box, enter a file name.
-
Select the Task Template Parameters tab to continue.
-
-
Task Template Parameters. Allow you to schedule the task template to run now or at a later date and time.
-
Schedule now
-
From the Run type dropdown menu, select a run type.
-
In the Task description text box, enter a description for the run type.
-
Click Run to schedule the task to run now.
-
-
Schedule later
-
In the Date time box, click Calendar (
), select a date and time, and then click Apply. -
From the Run type dropdown menu, select a run type.
-
In the Task description text box, enter a description for the run type.
-
Click Run to schedule the task to run later.
-
-