Configuration maintenance: Service point channels
Accessible from the Configuration maintenance: Service point ID page, the Channels card displays a table with all the service point channels that are linked to the service point.
The card supports the following actions:
-
To hide the data on the card, click Collapse (
 ).
). -
To show the data on the card, click Expand (
 ).
).
The table consists of the following columns:
-
Number
-
Description
-
Unit of measure
-
Type
-
Interval length
-
Data source
-
Meter ID
-
Meter channel
-
Formula
-
Billing validation (clickable)
-
Load Research validation (clickable)
-
Other validation (clickable)
-
Estimation (clickable)
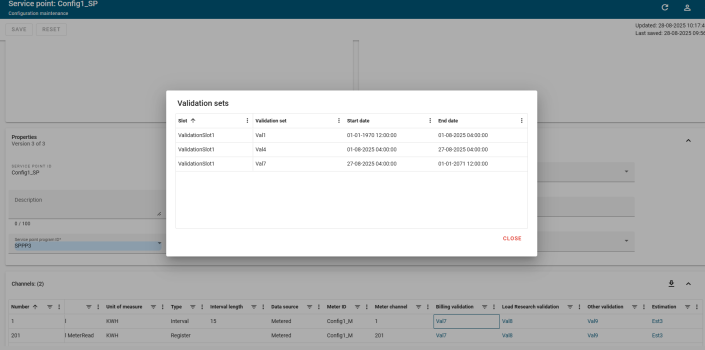
Note: Validation set related column headers are derived from the validation slot description. If the description changes, so does the column header.
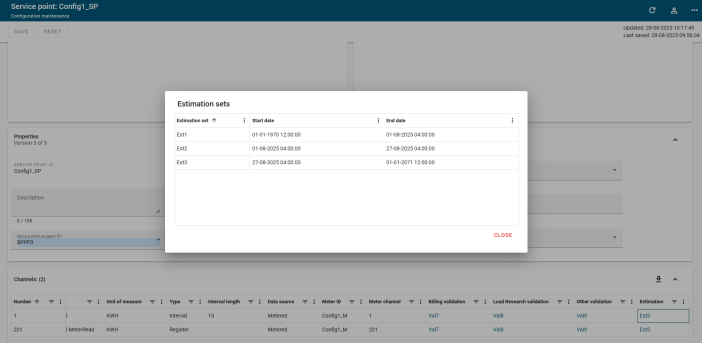
The channel details show along with its linked Validation set for each slot and Estimation set details. If a channel does not have a Validation set or an Estimation set linked, then the value shows as "None" for these columns.
-
Clicking the validation value displays the history of the Validation set attached to that slot.
-
Clicking the estimation value displays the history of Estimation set attached to that slot.
The table supports the following actions:
-
To change the sort order, select any column header to sort by that attribute. An up arrow appears in the column header, indicating that the sort is in ascending order. No arrow indicates the default sort order. Select the column header again to switch to descending order, indicated by a down arrow.
Tip: The horizontal and vertical scroll bars appear when additional rows and columns are added to the card.
-
To adjust the width of any column, drag the edges in the column header. To view any text that has been truncated due to width constraints, hover over the text to reveal a tooltip with full text.
-
To reorder the columns, drag a column header to the preferred location in the table.
-
To pin any column to the left or right side of the table, hover over the preferred column header, select Menu (
 ), and select Pin Column. Then select Pin Left or Pin Right. To remove a column pin, select No Pin.
 Tip: From the same menu, you can also reset the column width for either the current column or all columns. Select Autosize This Column or Autosize All Columns.
-
To hide columns or to restore hidden columns, hover over any column header and select Menu (
 ).
).In the dialog that appears, select Choose Columns (
 ) to view the column-selection tab. Clear the columns that you want to hide and select any hidden columns that you want to restore to the table. Click "x" to close the dialog.
Note: Primary columns can be reordered but not hidden.
-
To reset the columns and clear all changes to the current view, hover over any column header, select Menu (
), and select Reset Columns. -
To view the formula for a channel, select Formula (
 ) in the Formula column. The Formula dialog appears. Select Copy to clipboard (
 ) to copy the formula to the clipboard. Click Close to close the dialog.
 Note: By default, if a column does not have a value for all the rows in the table, then that column will be hidden.
Exporting the data
To export the data represented in the table, take the following steps:
-
Select Download (
 ).
). The Export dialog appears.
-
From the File type dropdown menu, select the file type that you want to export.
-
Click Export to export the file.
Note: Depending on which browser you use and your browser's settings, you may have to select a location to save the file.
Related topics: