Creating a file import configuration
-
On the File Import Configuration page, click Create.
-
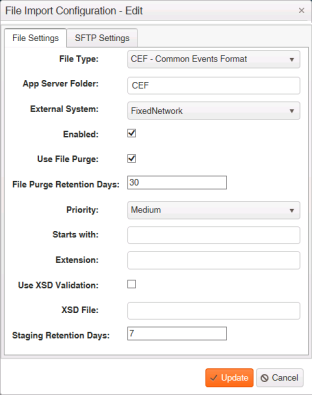
Enter the File Settings information.

-
Select a file type from the File Type menu.
-
Type the file location in App Server Folder. The App Server Folder typically has the same name as the file type.
Tip: If the folder you specify does not exist, it is automatically created.
-
Select the collection system from the External System menu.
-
(Optional) Clear the File Settings tab's Enabled checkbox to disable the file import type option. If the file import configuration is not enabled, incoming files that match the configuration will not be processed. The Enabled checkbox is selected by default.
Note: This setting is depicted in the Enabled column on the File Import Configuration page.
-
(Optional) Clear the Use File Purge checkbox to retain all input files during a scheduled system purge. The Use File Purge checkbox is selected by default.
Important! If you clear this checkbox, import files will accumulate on your system, filling up available disk storage. Clear this checkbox only if you are going to implement a separate process for archiving and removing old import files.
-
Type the number of days to keep input files before they are purged in File Purge Retention Days.
Important! If any of the purge options are enabled, it is best to determine an alternate way of saving or backing up files. Backing up or saving the files guarantees the data is available if an account question is asked. Itron Analytics does not determine whether files have been processed before purging them, so use a value that provides enough time to import the files successfully.
-
Select a file processing priority for the folder from the Priority menu.
Tip: Priority can determine the order in which data is processed. If an application is multi-threaded and contains few files, prioritizing will not change the process. If an application has a large backlog of incoming files, the files with a higher priority will be processed first.
-
(Optional) Type a value in Starts With to identify all the file names in the previously designated source folder that start with the specified value. For example, if you type "IDE" in Starts With, the File Import will find all the files in the source folder that start with IDE and will match them to the File Import for processing.
-
(Optional) Type a value in Extension to identify all the file names in the previously designated Source Folder with a matching extension. For example, if you type "xml" in Extension, the File Import will find all the files in the source folder with the xml extension and will match them to the File Import for processing.
Important! This is case sensitive. If you type "XML" and the export files end with "xml," the files will not be loaded.
-
(Optional) Select the Use XSD Validation checkbox to validate the file against an XML schema definition during the import. The Use XSD Validation checkbox is cleared by default.
Tip: Because of the performance impact, only select this option for testing initial integration or major releases.
-
(Optional) Type the location of the XSD file in XSD File. This file contains the XML schema definition that is used to validate the file.
Tip: The results of the XSD file validation are viewable in the Import Monitoring dashboard.
-
Type a value in Staging Retention Days. This determines how many days imported meter reading and event data without a current configuration is saved before it is purged. The default value is 0 days. To avoid having to re-import meter data after a new configuration is importing using the MDI in the system, you may want to set this value to longer than 0 days.
Important! MV-RS and FCS software data is typically read monthly. If you import data from MV-RS or FCS software, set the Staging Retention Days to 45 days.
-
-
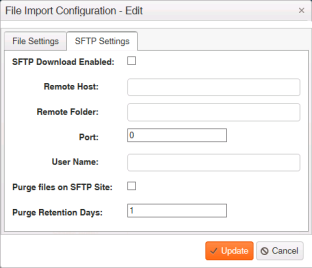
(Optional) Enter the SFTP Settings information.

Note: Itron Analytics only supports SFTP.
-
(Optional) Select the SFTP Settings tab's SFTP Download Enabled checkbox to download data files from the IP address that is listed in Remote Host. The SFTP Download Enabled checkbox is cleared by default.
Note: If an import file is being uploaded as Itron Analytics tries to download it using SFTP, Itron Analytics waits 15 minutes before trying to download again.
-
(Optional) Type the IP address from which the data files are downloaded in Remote Host.
-
(Optional) Type the name of the SFTP server source folder that contains the import files in Remote Folder.
-
(Optional) Type the SFTP Communication port number in Port.
-
(Optional) Type the SFTP username in User Name.
-
(Optional) Select the Purge Files on SFTP Site checkbox to purge data from the SFTP folder during a scheduled system purge. The Purge Files on FTP Site checkbox is cleared by default.
-
(Optional) Type the number of days input files are saved before they are purged in Purge Retention Days.
-
-
Click Update.