Adjusting the calibration of an Intelis Gas Meter
Before you perform the Adjust Calibration command, you are required to run the meter on a prover station. This determines the meter's accuracy, and the results are used during the Adjust Calibration workflow. Before you start the Adjust Calibration command, review all information in Intelis Gas Meter Test Mode Operations and Recalibration, and the sections that follow.
Note: The meter must be out of test mode to perform the Adjust Calibration command. If the meter is in test mode, perform the Exit Test Mode command before you start this procedure.
Part of this Adjust Calibration workflow includes unsealing the meter. After you complete this workflow, you must use the separate Seal Meter command to re-seal the meter.
If the meter is operating in mobile mode, you must know the meter's Unlock ID to complete the Adjust Calibration command. The Unlock ID is supplied at the time of meter shipment from the factory using a password protected meterseal (unlock ID) file.
- From the Tools menu, select Intelis Gas Meter or Gen5 Intelis Gas Meterdepending on your meter type.
- Select Test Mode Operations.
- Select Adjust Calibration.
A warning message appears indicating that Adjusting Calibration will unseal the meter.
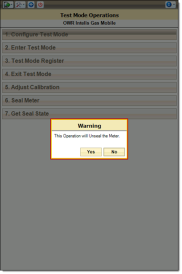
- Select Yes.
- (Mobile ChoiceConnect mode in Ready to Secure state only) If you are prompted to enter the Unlock ID, enter the Unlock ID.
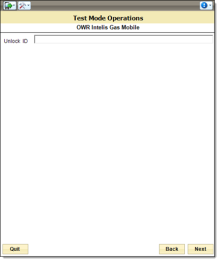
- Select Next.
The Parameters screen appears.
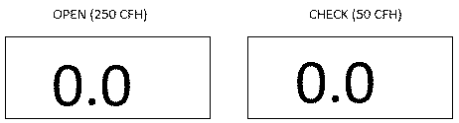
To demonstrate an example of adjusting the calibration, a sample prover station test result is displayed below for reference.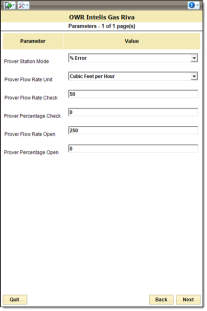
Use the following settings to adjust the meter calibration as it relates to your test results: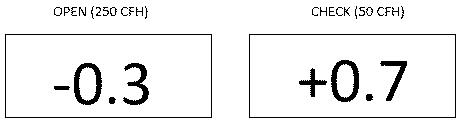
- Depending on the meter's firmware version, FDM may accept flow rate entries only in a whole number format or it may accept flow rate entries of up to two decimal places.
-
- Prover station mode. Use the drop-down menu to select the % in which your prover station results are expressed:
- (Example selection) % Error
- % Accuracy
- % Proof
- Prover flow rate unit. From the drop-down menu, select the flow rate unit:
- (Example selection) Imperial (cubic feet per hour)
- Metric (cubic meters per hour)
- Prover flow rate check. Enter the prover station check flow rate. This is typically 20-35% of the meter capacity. (Example entry 50)
Valid values:
- Cubic Meters Per Hour. 0.01-11.32
- Cubic Feet Per Hour. 0.01 to 400.00
- Station Mode of % Error. -7.00% to +7.00%
- Station Mode of % Proof. 93.00% to 107.00%
- Station Mode of % Accuracy. 93.00% to 107.00%
- Prover percentage check. Enter the value from the test mode screen for the meter's check result. (Example entry +0.7).
- Prover flow rate open. Enter the prover station open flow rate. This is typically 80-100% of the capacity. (Example entry 250). Note: The Prover flow rate open value must be greater than the Prover flow rate check value.
- Prover percentage open. Enter the value from the prover screen for the meter's open result. (Example entry -0.3).
- Prover station mode. Use the drop-down menu to select the % in which your prover station results are expressed:
- Select Next.
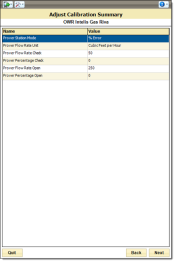
The Adjust Calibration Summary appears so that you may review your parameter changes.
- Select Next.
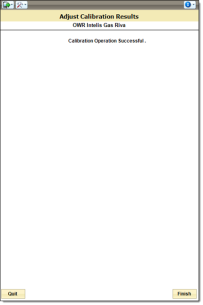
A progress bar indicates that the meter's calibration is being adjusted.
The meter uses the entered values to calculate the required calibration parameters to a target of one of the following, depending on your selected prover station mode:
- % Error. 0% open, 0% check
- % Accuracy. 100% open, 100% check
- % Proof. 100% open, 100% check
- Click Quit or Finish to return to the Tools screen.
- (Recommended) Rerun the meter on the prover station to verify the meter calibration. It is expected that you see the results that match the following example:
If the accuracy results are not as expected, repeat the calibration steps.Note: Prover station accuracy is estimated to be +/- 0.15-0.25%.